716 lines
23 KiB
Markdown
716 lines
23 KiB
Markdown
> **Vendored copy.** This directory is a snapshot of the upstream
|
||
> [`gevhaz/hugo-theme-notrack`](https://github.com/gevhaz/hugo-theme-notrack)
|
||
> theme, copied into the repo on 2026-04-25 (was previously a git submodule).
|
||
> Local edits live here directly. To pull upstream changes, diff against
|
||
> the upstream repo manually — there's no submodule link to do it for you.
|
||
|
||
---
|
||
|
||
# Notrack
|
||
|
||
Notrack is an original, minimal theme with a focus on self-sufficiency and
|
||
decentralization. By default, Notrack does not rely on any third parties to
|
||
serve your website.
|
||
|
||
The README is long. You can use the automatic table of contents in GitHub to
|
||
navigate (upper right corner of rendered README).
|
||
|
||
## Dependencies
|
||
|
||
You will need the extended edition of Hugo in order to use this theme. This is
|
||
the edition Hugo's developers recommend for most users. You probably already
|
||
have it, but you can double check with:
|
||
|
||
```console
|
||
$ hugo version
|
||
hugo v0.115.4+extended linux/amd64 BuildDate=unknown
|
||
```
|
||
|
||
Note the "+extended" after the version number. Information about the standard
|
||
and extended versions may be found within Hugo's [installation
|
||
instructions](https://gohugo.io/installation/).
|
||
|
||
## Demonstration web page
|
||
|
||
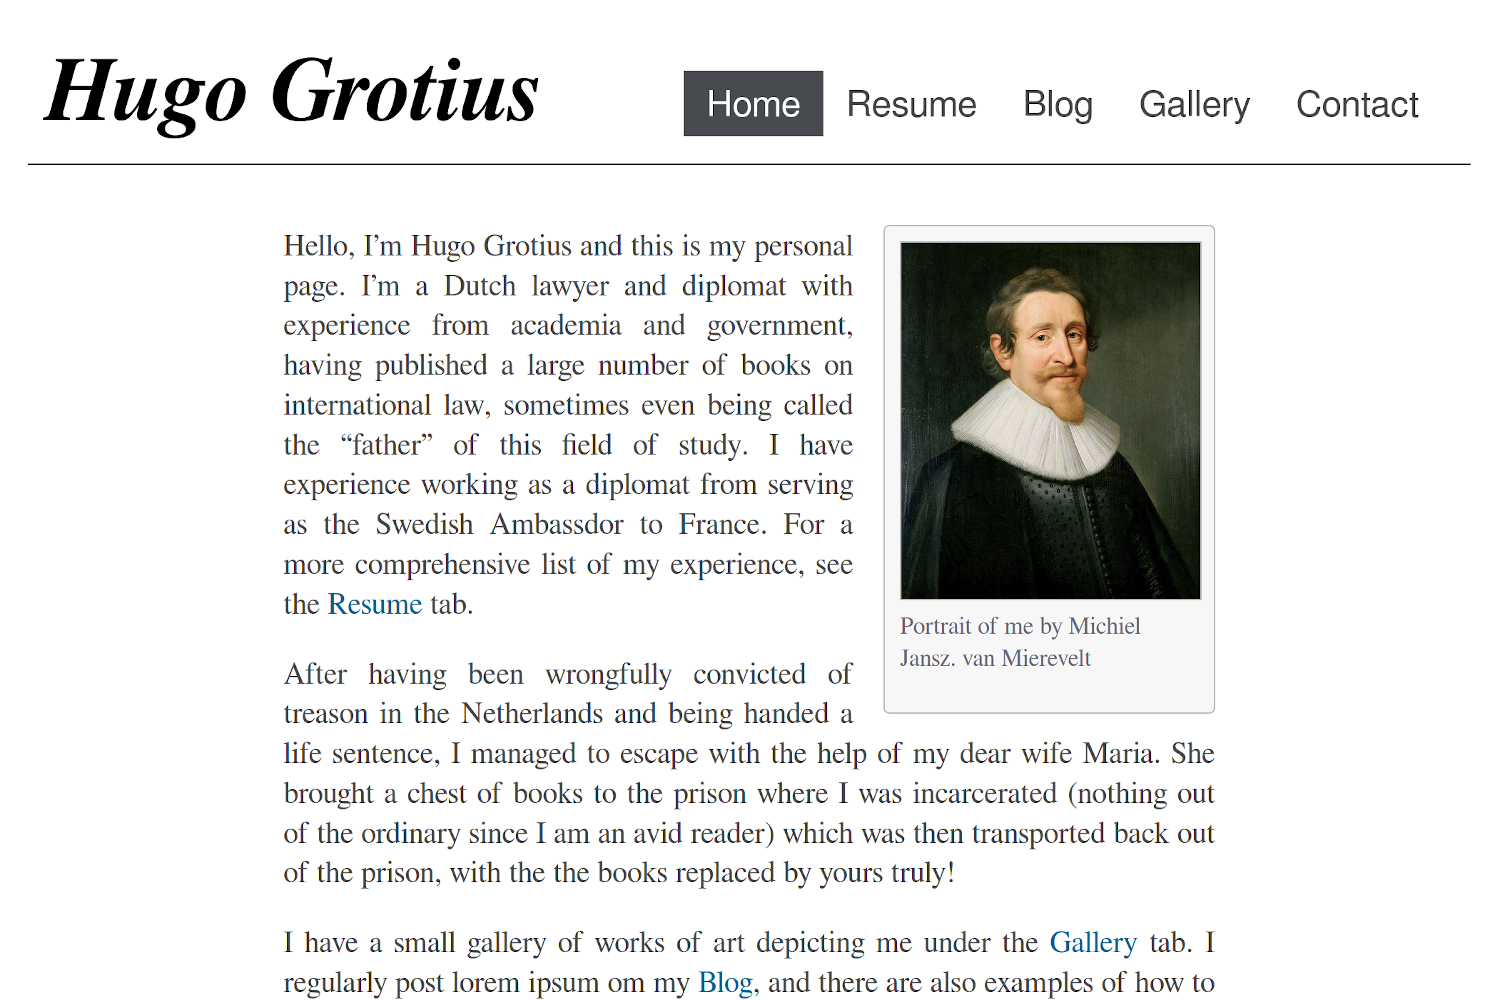
The theme has a demonstration web page that looks like this:
|
||
|
||
|
||
|
||
There is a working demonstration page here: <https://gevhaz.github.io>
|
||
|
||
You can also run the demonstration web page on a local server. This is how you
|
||
do it:
|
||
|
||
```console
|
||
$ git clone https://github.com/gevhaz/hugo-theme-notrack notrack
|
||
$ cd notrack/exampleSite/
|
||
$ hugo server -D --themesDir ../..
|
||
```
|
||
|
||
You can them see the example website in your browser and interact with it. Hugo
|
||
will print instructions for what address to use. Usually it is
|
||
`http://localhost:1313/`.
|
||
|
||
## How to write a website from scratch with Notrack
|
||
|
||
There are two ways to get started with this theme – the bottom-up approach and
|
||
the top-down approach. The top-down approach is to just clone the example site
|
||
and modify it until it looks how you want. The bottom-up approach is to start
|
||
from scratch with `hugo new site` and gradually add the components you need.
|
||
This section explains how to do that.
|
||
|
||
### The basic structure
|
||
|
||
Notrack is built with a few types of pages in mind. The [home
|
||
page](#how-to-create-a-home-page) is mandatory, but the
|
||
[blog](#how-to-create-a-blog), ["About me"-page](#how-to-add-an-about-me-page),
|
||
[gallery](#how-to-create-a-gallery-page) and [resume](#how-to-create-a-resume)
|
||
are all optional.
|
||
|
||
This section deals with creating minimal version of each type of page the
|
||
theme supports. In the next section we will deal with adding custom content to
|
||
the pages using shortcodes (but you can of course use the default Hugo
|
||
shortcodes in any page as well).
|
||
|
||
#### How to create a home page
|
||
|
||
First, create a new Hugo project in a directory of your choice:
|
||
|
||
```console
|
||
$ hugo new site <my-webpage>
|
||
$ cd <my-webpage>
|
||
$ git init
|
||
$ git submodule add https://github.com/gevhaz/hugo-theme-notrack.git themes/notrack
|
||
```
|
||
|
||
> [!NOTE]
|
||
> I use angle brackets ('<' and '>') to indicate a placeholder. You should put
|
||
> replace it with your own value.
|
||
|
||
Your project should already have a file called `hugo.toml`. Open it and make
|
||
sure it looks something like this:
|
||
|
||
```toml
|
||
baseURL = '<URL where you plan to publicize your web page>'
|
||
languageCode = '<language code for language the website uses, e.g. en-us>'
|
||
title = '<My New Hugo Site>'
|
||
theme = 'notrack'
|
||
|
||
[params]
|
||
author = '<Your name>'
|
||
# optional, defaults to author:
|
||
siteHeading = '<the text that goes at the top of your webpage>'
|
||
```
|
||
|
||
Now you are ready to add the first content to the web page. Create the home
|
||
page, which is the first page users see:
|
||
|
||
```console
|
||
$ hugo new _index.md
|
||
```
|
||
|
||
This could contain a short introduction of what is on the website or of
|
||
yourself. Here is an example:
|
||
|
||
```markdown
|
||
+++
|
||
date = '2024-11-10T16:46:03+02:00'
|
||
title = ''
|
||
+++
|
||
|
||
Welcome to my web page!
|
||
```
|
||
|
||
Now you have a working website. You can run it locally with:
|
||
|
||
```console
|
||
$ hugo server
|
||
```
|
||
|
||
or deploy it somewhere according to the instructions form Hugo:
|
||
<https://gohugo.io/hosting-and-deployment/>
|
||
|
||
You can further extend the home page:
|
||
|
||
- Add an [image](#the-image-shortcode) (for example like in the demonstration
|
||
web page)
|
||
- Add a [footer](#how-to-set-a-footer) (that will be shown on all pages)
|
||
|
||
#### How to create a blog
|
||
|
||
> TL;DR: You add blog posts the default way, but don't forget to add the blog
|
||
> section to the navigation bar so that people can find it.
|
||
|
||
First, create the mandatory `_index.md` page for the blog:
|
||
|
||
```console
|
||
$ hugo new blog/_index.md
|
||
```
|
||
|
||
And give it the following content:
|
||
|
||
```markdown
|
||
+++
|
||
title = '<no need to change>'
|
||
date = '<no need to change>'
|
||
|
||
[menu.main]
|
||
identifier = 'blog'
|
||
name = 'Blog'
|
||
weight = 5
|
||
+++
|
||
```
|
||
|
||
Under `[params]` in your `hugo.toml`, add:
|
||
|
||
```toml
|
||
mainSections = ['blog']
|
||
```
|
||
|
||
> [!NOTE]
|
||
> The section names are based on folder names, so if you call the folder
|
||
> something other than 'blog', make sure that that is reflected.
|
||
|
||
Add a blog post:
|
||
|
||
```console
|
||
$ hugo new blog/post-1.md
|
||
```
|
||
|
||
And put any content you want in it. Don't forget to set `draft` to `false`.
|
||
|
||
After adding or changing these three files, you will see a summary of the blog
|
||
post on the home page, and a link to the blog in the menu.
|
||
|
||
You can now continue blogging by just adding new posts with `hugo new blog/<post
|
||
name>.md`
|
||
|
||
For the blog, you may also be interested in:
|
||
|
||
- [How to create tags and categories
|
||
pages](#how-to-create-tags-and-categories-pages)
|
||
- [How to create an archive page](#how-to-create-an-archive-page)
|
||
|
||
#### How to add an About Me page
|
||
|
||
There is nothing special about the About Me page, but the theme supplies a
|
||
couple of shortcodes that can be useful if you want to display social links like
|
||
in the demonstration site:
|
||
|
||
<img
|
||
src="https://raw.githubusercontent.com/gevhaz/hugo-theme-notrack/master/images/social-links.png"
|
||
width="40%" alt="Example of social link shortcodes">
|
||
|
||
To prepare for using one of the shortcodes, configure your social media user
|
||
names like this in the site configuration:
|
||
|
||
```toml
|
||
[params.social]
|
||
github = '<your github username>'
|
||
email = '<email address>'
|
||
```
|
||
|
||
For all available social icons, see the
|
||
[`data/notrack/social.yaml`](https://github.com/gevhaz/hugo-theme-notrack/blob/master/data/notrack/social.yaml)
|
||
file. There are 65 of them.
|
||
|
||
Then, create a new page, for example like this:
|
||
|
||
```console
|
||
$ hugo new contact.md
|
||
```
|
||
|
||
Make sure you [add it to the navigation
|
||
bar](#how-to-add-a-page-to-the-navigation-bar), for example like this:
|
||
|
||
```toml
|
||
[menu.main]
|
||
name = 'About me'
|
||
weight = 90
|
||
```
|
||
|
||
Finally, use either the [`social`](#the-social-shortcode) or
|
||
[`contact-box`](#the-contact-box-shortcode) shortcodes in that page. The former
|
||
produces the element at the bottom of the above image, and the latter produces
|
||
the element on the right.
|
||
|
||
#### How to create a Gallery Page
|
||
|
||
A gallery page is just a normal page. Create a page:
|
||
|
||
```console
|
||
$ hugo new gallery.md
|
||
```
|
||
|
||
Then use the [gallery shortcodes](#the-gallery-shortcodes) on it.
|
||
|
||
#### How to create a resume
|
||
|
||
A resume page is just a normal page. Create a page:
|
||
|
||
```console
|
||
$ hugo new resume.md
|
||
```
|
||
|
||
Then use the [resume shortcodes](#the-resume-shortcodes) on it.
|
||
|
||
#### How to create tags and categories pages
|
||
|
||
If you have a blog, Hugo generates tags and categories pages for you
|
||
automatically. They are available at `<your-website.com>/tags` and
|
||
`<your-website.com>/categories` respectively. Don't forget to actually tag and
|
||
categorize your posts for them to show up there.
|
||
|
||
Notrack puts buttons at the top of your blog with links to the tags and
|
||
categories (and an archive page [if you have
|
||
one](#how-to-create-an-archive-page)). If you don't want these, disable it in
|
||
your site configuration:
|
||
|
||
```toml
|
||
[params]
|
||
showTaxonomyLinks = false
|
||
```
|
||
|
||
You might instead want to have a
|
||
[drop-down](#how-to-add-a-page-to-drop-down-menu) menu that links to tags and
|
||
categories, like this:
|
||
|
||

|
||
|
||
To add a tags page and a menu entry for it simply create a new `tags` section
|
||
and add its index page as a sub-menu to the blog. You create the section like
|
||
this:
|
||
|
||
```console
|
||
$ hugo new tags/_index.md
|
||
```
|
||
|
||
The only needed content is a menu definition in the front matter, like this:
|
||
|
||
```toml
|
||
[menu.main]
|
||
parent = 'blog'
|
||
name = 'Tags'
|
||
```
|
||
|
||
> [!IMPORTANT]
|
||
> Take care that the parent value is the _identifier_ of the blog menu that you
|
||
> have set in the blogs index page.
|
||
|
||
The procedure is exactly the same for categories.
|
||
|
||
#### How to create an archive page
|
||
|
||
You can add an Archive page that lists all blog posts by year and month. Do this
|
||
by adding a `[taxonomies]` section to your site configuration:
|
||
|
||
```toml
|
||
[taxonomies]
|
||
year = "year"
|
||
month = "month"
|
||
tags = "tags"
|
||
categories = "categories"
|
||
```
|
||
|
||
> [!NOTE]
|
||
> The `tags` and `categories` taxonomies are enabled by default but will be
|
||
> disabled when you add a taxonomies section to your site configuration unless
|
||
> you specifically add them.
|
||
|
||
Then add an archive page:
|
||
|
||
```console
|
||
$ hugo new archive/_index.md
|
||
```
|
||
|
||
It just needs to have a front matter specifying that it should have the
|
||
`archives` layout:
|
||
|
||
```toml
|
||
title = 'Archive'
|
||
layout = 'archives'
|
||
```
|
||
|
||
You will automatically get a button at the top of the blog page linking to the
|
||
archive unless you [disable it](#how-to-create-tags-and-categories-pages). You
|
||
might otherwise want to add the page to the Blog
|
||
[drop-down](#how-to-add-a-page-to-drop-down-menu) menu:
|
||
|
||
```toml
|
||
layout = 'archives'
|
||
[menu.main]
|
||
parent = 'blog'
|
||
name = 'Archive'
|
||
```
|
||
|
||
> [!IMPORTANT]
|
||
> Make sure the value of `parent` is the identifier you used for your blog menu
|
||
> entry or it won't show up in the drop-down.
|
||
|
||
### Shortcodes from Notrack
|
||
|
||
Notrack supplies a few custom shortcodes. In this section I present the list of
|
||
all the shortcodes in a table, and show how to use the non-trivial ones.
|
||
|
||
#### Shortcodes provided by Notrack
|
||
|
||
| Category | Shortcode | Description |
|
||
| :--- | :--- | :--- |
|
||
| **Contact info** | `contact-box` | Displays contact info set in `params.social` |
|
||
| | `social` | Displays contact info set in `params.social` |
|
||
| **Photo Gallery** | `gallery-category` | Container for `gallery-photo` shortcodes |
|
||
| | `gallery-modal` | HTML to allow for full page view of gallery photos |
|
||
| | `gallery-photo` | Include a photo in a gallery |
|
||
| | `gallery-script` | Script to allow for full page view of gallery photos |
|
||
| **General** | `image` | More advanced version of figure |
|
||
| | `video` | Similar to an ordinary `<video>` HTML tag but with a CSS class to make it look good in posts |
|
||
| | `rawhtml` | For including raw HTML without the global unsafe option for Goldmark |
|
||
| **Resume** | `container` | Container for resume shortcodes |
|
||
| | `resume-entry` | One entry in a resume (e.g. a university degree) |
|
||
| | `resume-section` | One section in resume (e.g. "Education") |
|
||
| | `resume-subcategory` | Creates a heading within a section of the resume |
|
||
|
||
#### The raw HTML shortcode
|
||
|
||
`rawhtml` can be used like this:
|
||
|
||
```go
|
||
{{< rawhtml >}}<p>A paragraph</p>{{< /rawhtml >}}
|
||
```
|
||
|
||
This allows you to use HTML to create elements that you can't create
|
||
with just markdown without allowing unsafe HTML in the site configuration file.
|
||
I'm not a security expert, and there might be a good reason why unsafe HTML
|
||
is disabled by default. If you think this shortcode shouldn't be part of
|
||
the theme, feel free to open an issue and say why.
|
||
|
||
#### The video shortcode
|
||
|
||
The `video` shortcode basically just creates a HTML `<video>` tag with a
|
||
class that I've added some styling for. Use it like this:
|
||
|
||
```go
|
||
{{< video src="your_video.mp4" type="video/mp4" preload="auto" >}}
|
||
```
|
||
|
||
Your video needs to be in the `static` folder or a subdirectory of it such
|
||
as "video" (in which case you'd add the subdirectory in the `src`
|
||
parameter.
|
||
|
||
#### The image shortcode
|
||
|
||
The `image` shortcode is for adding images, but provides a few more options than
|
||
Hugo's default `figure` shortcode. The following extra options are provided:
|
||
|
||
| Parameter name | Allowed Values |
|
||
| :--- | :--- |
|
||
| `float` | right/left |
|
||
| `frame` | true/false/leave out |
|
||
| `wide` | true/false |
|
||
| `width` | e.g. `10em`, `50%`, `70px` |
|
||
| `height` | e.g. `10em`, `50%`, `70px` |
|
||
|
||
You can also use all the options for the
|
||
[`figure`](https://gohugo.io/content-management/shortcodes/#figure) shortcode.
|
||
|
||
Setting the `float` makes text wrap around the image, instead of it taking up
|
||
the full width of the page.
|
||
|
||
Here is an example of how to use it to add a picture to the home page:
|
||
|
||
```go
|
||
{{<image
|
||
float="right"
|
||
width="11em"
|
||
frame="true"
|
||
caption="Picture of me"
|
||
src="img/portrait.jpg"
|
||
>}}
|
||
```
|
||
|
||
Make sure the `src` value points to an existing picture. In this case it
|
||
should be in `static/img/portrait.jpg`.
|
||
|
||
#### The contact-box shortcode
|
||
|
||
The `contact-box` shortcode creates a frame with links to your social media or
|
||
other contact info on the rights side of the page, and, if you want, some text
|
||
on the left side of the box, outside the frame. Put this text within the
|
||
shortcode tags.
|
||
|
||
What social media links are present in the frame is decided by the `social` key
|
||
of your site configuration. See [here](#how-to-add-an-about-me-page).
|
||
|
||
For `contact-box`, there are three optional parameters, `float`, `width`
|
||
and `height`. This is similar to the `image` shortcode. `Float` makes
|
||
text wrap around the box (can be `right` or `left`), and the other two
|
||
naturally set the dimensions of the `<div>`, using inline CSS. The
|
||
parameters defaults to floating to the right, the width defaults to
|
||
`12em`, and the height defaults to `auto`.
|
||
|
||
#### The social shortcode
|
||
|
||
This is similar to the `contact-box` shortcode. It just shows clickable icons
|
||
for your configured social media accounts. Like `contact-box`, the `social` key
|
||
of the site configuration is the source of what social media to include and what
|
||
your handles are.
|
||
|
||
#### The gallery shortcodes
|
||
|
||
There are four shortcodes for creating a gallery:
|
||
|
||
- `gallery-category`
|
||
- `gallery-photo`
|
||
- `gallery-modal`
|
||
- `gallery-script`
|
||
|
||
The first two are used in combination to create the actual gallery. Do
|
||
something like the following in one of your pages:
|
||
|
||
```go
|
||
{{< gallery-category >}}
|
||
{{< gallery-photo fn="<filename of first picture>" caption="<your caption>">}}
|
||
{{< gallery-photo fn="<filename of second picture>" caption="<your caption>">}}
|
||
{{< gallery-photo fn="<filename of third picture>" caption="<your caption>">}}
|
||
{{< gallery-photo fn="<filename of fourth picture>" caption="<your caption>">}}
|
||
{{< /gallery-category >}}
|
||
```
|
||
|
||
The pictures should be under `static/img/thumbnails` in your project.
|
||
|
||
If you want a modal to pop up with a zoomed in version, add the other
|
||
two shortcodes at the bottom of your page:
|
||
|
||
```go
|
||
{{< gallery-modal >}}
|
||
{{< gallery-script >}}
|
||
```
|
||
|
||
And place corresponding full-size images under `static/img/fullsize`.
|
||
The file names need to be the same as for the thumbnails.
|
||
|
||
Thumbnails should of course be small so that your page loads fast and
|
||
full-size should be large enough that they don't look pixelated when
|
||
covering the full space of a web browser. One way to resize images is
|
||
with [GraphicsMagick](http://www.graphicsmagick.org/): `gm mogrify
|
||
-resize 1920x1920 *.jpg`, which will resize all images in the current
|
||
folder to a maximum width/height of 1920 pixels (while maintaining the
|
||
aspect ratio).
|
||
|
||
#### The resume shortcodes
|
||
|
||
There are some shortcodes that can help you create a resume. These are:
|
||
|
||
- `container`
|
||
- `resume-section`
|
||
- `resume-category`
|
||
- `resume-entry`
|
||
|
||
`Container` just creates a `<div>` element with a specific class.
|
||
`resume-section` needs a title which will be shown to the left of it's content
|
||
(if it can fit on the screen, otherwise it's on top). Within this, you put one
|
||
or more `resume-entry` shortcodes. This shortcode takes the three parameters
|
||
`what`, `where` and `when` (see example usage below). It also takes raw HTML
|
||
within the shortcode tags. There is styling for `<p>`s, links, and unordered and
|
||
ordered lists. Apart from that, site-wide CSS is used. Example usage:
|
||
|
||
```go
|
||
{{< container >}}
|
||
{{< resume-section title="About Me" >}}
|
||
{{< resume-entry >}}
|
||
<p>
|
||
Some info about you.
|
||
</p>
|
||
{{< /resume-entry >}}
|
||
{{< /resume-section >}}
|
||
|
||
{{< resume-section title="Education" >}}
|
||
{{< resume-entry what="Bachelor's program of Computer Science"
|
||
where="Sidney University"
|
||
when="2010–2013">}}
|
||
<ol>
|
||
<li> Some comment on what skills you learned</li>
|
||
<li> Some other comment </li>
|
||
</ol>
|
||
{{< /resume-entry >}}
|
||
{{< /resume-section >}}
|
||
{{< /container >}}
|
||
```
|
||
|
||
A tip is that you can also use the `resume-entry` shortcode with markdown. Just
|
||
switch use % instead of < and make sure that your markdown doesn't have any
|
||
white space in front of it (or all of it will be interpreted as code):
|
||
|
||
```go
|
||
{{% resume-entry what="Bachelor's program of Computer Science"
|
||
where="Sidney University"
|
||
when="2010–2013" %}}
|
||
* Some comment on what skills you learned
|
||
* Some other comment
|
||
{{% /resume-entry %}}
|
||
```
|
||
|
||
### Navigation bar
|
||
|
||
#### How to add a page to the navigation bar
|
||
|
||
Add it to `main` menu in the front matter of the page:
|
||
|
||
```toml
|
||
[menu.main]
|
||
identifier = 'contact'
|
||
name = 'About me'
|
||
weight = 90
|
||
```
|
||
|
||
Don't use the site configuration file to add menus because then the highlighting
|
||
of active tabs might not work (at least not if drop-down menus are involved).
|
||
|
||
#### How to add a page to drop-down menu
|
||
|
||
This theme has a navigation bar at the the top of all pages, with buttons like
|
||
"Home", "Blog", "About me", etc. depending on how you configure it. You can make
|
||
it so you get a drop-down menu when hovering over a button. An example is the
|
||
"Blog" button in the demonstration website.
|
||
|
||
If the button you want to use as the root of the drop down menu already exists,
|
||
you just need to set it as the parent of your page's menu entry. Your page's
|
||
front matter might look like this:
|
||
|
||
If your page is "About blog" and you want to add it to blog drop-down.
|
||
|
||
```toml
|
||
[menu.main]
|
||
parent = 'blog'
|
||
name = 'About blog'
|
||
```
|
||
|
||
You might want to have a button just for holding the drop-down menu. If so,
|
||
create a menu entry for a non-existent page in your site configuration:
|
||
|
||
```toml
|
||
[menu]
|
||
[[menu.main]]
|
||
identifier = "other"
|
||
name = "Other"
|
||
pageRef = '#'
|
||
weight = 30
|
||
```
|
||
|
||
The lower the weight, the further to the left in the navigation bar the entry
|
||
goes. A `pageRef` of '#' makes it so that pressing the button doesn't change the
|
||
page.
|
||
|
||
Now that you have created a dummy menu entry, you can add your real page to it
|
||
just like before by referencing it as a parent:
|
||
|
||
```toml
|
||
[menu.main]
|
||
parent = 'other'
|
||
name = 'My links'
|
||
```
|
||
|
||
### Other site configuration
|
||
|
||
#### How to set a footer
|
||
|
||
If you want to add a footer to your web page, you can use the `footer` key in
|
||
your configuration, e.g:
|
||
|
||
```toml
|
||
[params]
|
||
footer = """\
|
||
This work is licensed under a Creative Commons Attribution-ShareAlike 4.0 \
|
||
International License.\
|
||
"""
|
||
```
|
||
|
||
This will add a HTML <footer> element with a <span> element with your text in
|
||
it.
|
||
|
||
#### How to disable or customize home page blog summary
|
||
|
||
By default, the theme provides a summaries of the three latest blog posts on the
|
||
home page if you have a blog. If you don't want that, set `showBlogLatest` to
|
||
false in your site configuration file. You may also want to change the number of
|
||
posts shown and the heading above it (default "Latest from the blog") In
|
||
`hugo.toml`, it would look like this:
|
||
|
||
```toml
|
||
[params]
|
||
showBlogLatest = true
|
||
blogLatestHeading = 'Latests posts'
|
||
nBlogLatest = 6
|
||
```
|
||
|
||
#### Adding comments to blog
|
||
|
||
For backward-compatibility, it is still possible to enable Disqus comments.
|
||
However, I advise against it due to the privacy issues for your users, see the
|
||
[Disqus Wikipedia
|
||
article](https://en.wikipedia.org/wiki/Disqus#Criticism,_privacy,_and_security_concerns).
|
||
|
||
Disqus is implemented the [default Hugo
|
||
way](https://gohugo.io/content-management/comments/#add-disqus) so just add your
|
||
Disqus Shortname in the site configuration file and all blog posts will have a
|
||
comments section.
|
||
|
||
## Acknowledgements and attributions
|
||
|
||
The theme does not secretly download any resources from other websites or CDNs.
|
||
It does, however, make use of a few other projects. These are included in the
|
||
theme files, so you'll homepage will serve the resources.
|
||
|
||
Some of the fonts under `static/fonts` are parts of the project [GNU
|
||
FreeFont](https://www.gnu.org/software/freefont/). They are licensed under
|
||
"GPLv3 or later". Licenses are also supposed to be included in the `.woff` files
|
||
themselves. Some of the fonts are edited by me to take up less space by
|
||
including fewer characters.
|
||
|
||
The monospace font in the same directory, used for code in the theme, is
|
||
[Mononoki](https://github.com/madmalik/mononoki). It is licensed under SIL OFL
|
||
1.1 ([https://scripts.sil.org/OFL](https://scripts.sil.org/OFL)).
|
||
|
||
The icons used for the `contact-box` and `social` shortcodes are from [Font
|
||
Awesome](https://github.com/FortAwesome/Font-Awesome) project. It's license is
|
||
SIL OFL 1.1 ([https://scripts.sil.org/OFL](https://scripts.sil.org/OFL)). A HTML
|
||
comment is included in the contact-box shortcode to show the license and source.
|
||
|
||
For matching the icons from Font Awesome with names for various social
|
||
networking services, I use the
|
||
[`social.yml`](https://github.com/dillonzq/LoveIt/blob/master/assets/data/social.yml)
|
||
file from the [LoveIt](https://github.com/dillonzq/LoveIt) theme, which uses the
|
||
MIT license. I modified it to use the *Font Awesome Solid* font for the email
|
||
icon, because the one in the original file was using the *Font Awesome Regular*
|
||
font, which it seems only Pro users of Font Awesome [can
|
||
use](https://fontawesome.com/plans). The solid one also looks better.
|
||
|
||
All of the images in the example site are in the public domain.
|
||
|
||
## Contributing
|
||
|
||
If you find a bug, please [open an
|
||
issue](https://github.com/gevhaz/hugo-theme-notrack/issues/new/choose).
|
||
|
||
If some change could be made or something could be added that is in line with
|
||
the style and philosophy of the theme, and it doesn't break anything, feel free
|
||
to make a pull request.
|
||
|
||
## FAQ
|
||
|
||
### Q: How do I update the theme?
|
||
|
||
`cd` to it and do a `git pull`.
|
||
|
||
### Q: I would like to change the CSS styling of the site looks
|
||
|
||
You can add your own CSS by creating a file `assets/css/userstyles.css`. The
|
||
theme will automatically pick it up.
|
||
|
||
### Q: My pages don't show up on the site
|
||
|
||
Have you removed `draft = true`? Have you [added the page to a
|
||
menu](#how-to-add-a-page-to-the-navigation-bar)? Also try restarting `hugo
|
||
server`.
|